Search is based on keyword.
Ex: "Metadata"
Do not search with natural language
Ex: "How do I create a new metadata type?"
Leave Feedback
Managing Groups
Audience: System Administrators
Create and maintain groups of users within the EQMS system. This enables them to control who can do what within the system. The first set of Groups are default System Groups - System and cannot be removed from the system. The second set are specific to the configuration of your module, you can create them yourselves and make them inactive when no longer needed.
To create and maintain EQMS Groups navigate to System Manager | Security | Groups, you will be presented with the group list, similar to below:
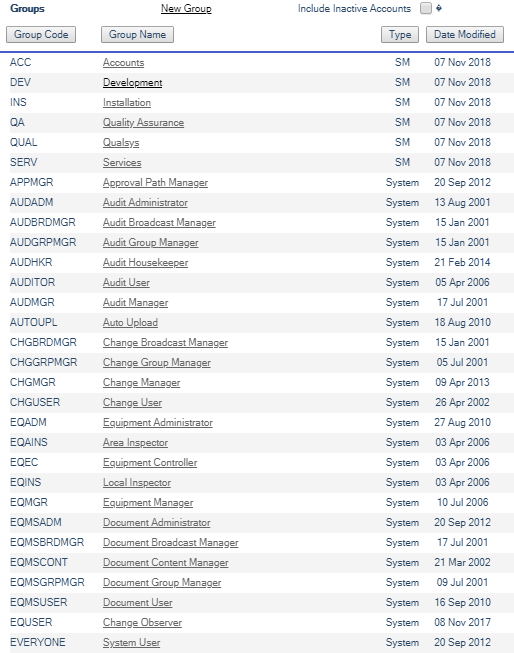
The list of Groups can be displayed in different sequences by clicking on the column headings, clicking a second time to reverse the sequence, and can be filtered to include or exclude Groups that have been made Inactive.
Note:
Before creating a new group record, check Include Inactive Accounts, check to see that the Group record does not already exist.
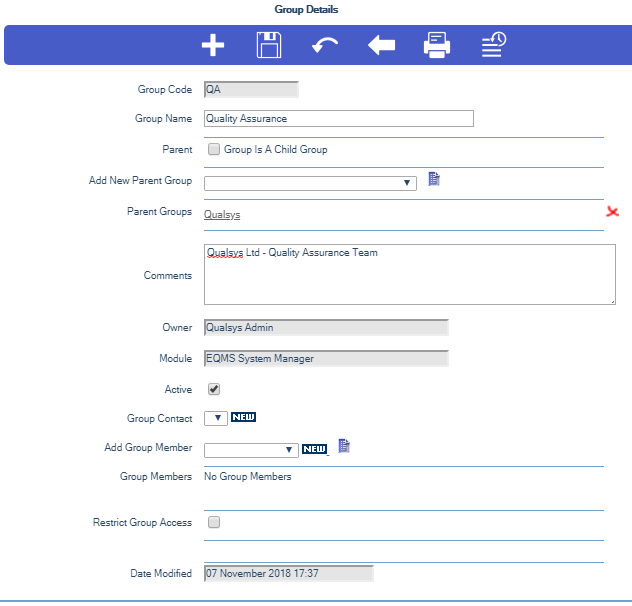
- Select New Group located above the Group Name column heading. The New Group Details screen is presented similar to this:
![]()
- Complete the fields and select the Save icon.
- The Group Code is mandatory and must be unique.
- The Group Name is mandatory and facilitates identifying the group of users.
- The Parent field changes the Group definition from Child Group to Parent Group.
- A Child Group membership consists of predefined User records.
- A Parent Group membership consists of associated predefined Child Groups.
- The Comments field is supplied for any definition of what the group is for.
- The Owner defaults to the person creating the Group record and is unchangeable.
- The Module is unchangeable and defaults to the EQMS module that the Group is created in.
- Active denotes whether the Group is available for selection from Drop down selections.
- The Group Contact is the User nominated for maintaining the Group.
- Add Group Member enables you to add Users into the Group.
- Group Members lists the Users that are a member of the Group.
- Restrict Group Access allows you to place update permissions on the Group
- Date Modified is unchangeable and is maintained by the system.
- To add Group members select Users from the Add Group Member dropdown box or……
- Load the User Selection List screen by selecting the Add Group Member icon. The User Selection List screen is presented similar to below:
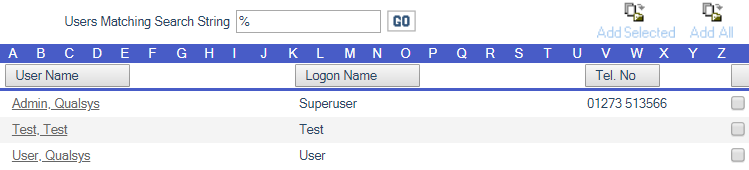
- Select Group Members by selecting a letter, checking the check box of the required User(s) and then clicking the Copy To icon in the yellow section of the screen.
Note:
The Copy To icon must be used after each alphabetical selection.
- Check your required Users and select the Copy To icon. When you return to the New Group Details screen, you will find the selected User(s) displayed.

- Select the Save icon if you want the Group record to be updated on the database. Otherwise you lose the data as you leave the screen.
- Select New Group located above the Group Name column heading. The Group Details screen is presented similar to this:
![]()
- Select the Parent check box and the New Group Details screen details will expand to reveal the Add New Child Group field as shown below:

- To add Child Groups select defined Child Groups from the Add New Child Group dropdown box
- Or, load the Group Selection List screen by selecting the Load Group List icon. The Group Selection List screen is presented similar to below:
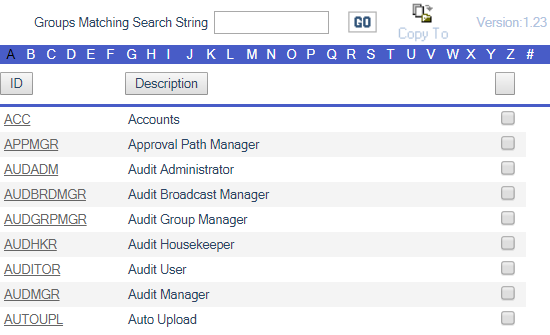
- Select a Child Group(s) by selecting a letter, checking the check box of the required Child Group(s) and then select the Copy To icon in the top section of the screen.
Note:
The Copy To icon must be used after each alphabetical selection.
- Check your required Child Group(s) and select the Copy To icon. When you return to the New Group Details screen, you will find the selected Child Group(s) displayed

- Complete the remaining fields as defined above and select the Save icon.
- Select the Save icon if you want the Group record to be updated on the database. Otherwise you lose the data as you leave the screen.
Important:
All Groups created in this manner will remain under the control of the System Administrator. If you wish to devolve responsibility date your Group records must be created in the corresponding EQMS Module under Tools | Manage Groups | New Group.
Restricting Group Access to other specific EQMS groups. Adding groups to the restrict group access permissions list allows members of that group, with the appropriate level of system permissions, allows the members of the group to be able to modify the current group.
- Select a Group Name in the list of Groups. You will be presented with the Group Details screen similar to this:
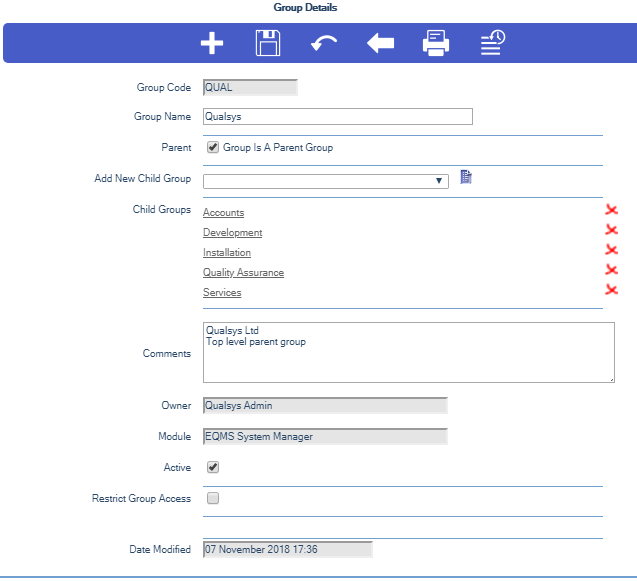
- Update permissions can be added by selecting Restrict Group Access. The Group Details screen will expand as shown below:
![]()
- To add a Group into the permissions open the Add New Permissions Group dropdown or load the Group Selection List screen by selecting the Load Group List icon. The Group Selection List screen is presented similar to this:
- Choose the required Group(s) from the filtered list and select the Copy To icon.
Note:
The Copy To icon must be used after each alphabetical selection.
- Select the Save icon from the header bar if you want the Group record to be updated otherwise you lose the data as you leave the screen. Unsaved permission groups are highlighted in pink!
Initially there may be 24 defined EQMS System Groups depending on the available Modules. Membership of a System Group gives access to specific EQMS functionality and permissions as described in the EQMS User Guide.
- Click on a Group Name in the list of EQMS Groups. You will be presented with a similar screen to this:
- Complete the fields and select the Save icon.
- You can modify any of the data except Group Code and Date Modified.
- From the dropdown box Group Contact you can select the person who will maintain the Group.
- The Comments field is supplied for any definition of what the group is for.
- Restrict Group Access applies specific update permissions to the Group.
- To add Group members select Users from the Add Group Member dropdown box
- Or... Load the User Selection List screen by selecting the List icon. The User Selection List screen similar to this is presented:
Note:
You cannot add individual users to a parent group
Select Group Members by selecting a letter, checking the tick box of the required User(s) and then selecting the Copy To icon in the top section of the screen. The Copy To icon must be used after each alphabetical selection.
- Check your required Users and select the Copy To icon. When you return to the Group Details screen, you will find the selected User(s) displayed:

- Select the Save icon from the blue icon bar if you want the Group record to be updated on the database. Otherwise you lose the data as you leave the screen.
|
© Qualsys Ltd 2019 All Rights Reserved |
info@qualsys.co.uk +44 114 282 3338 Aizlewood's Mill, Nursery Street,Sheffield, S3 8ND |