Search is based on keyword.
Ex: "Metadata"
Do not search with natural language
Ex: "How do I create a new metadata type?"
Leave Feedback
Managing Users
Audience: System Administrators, User Managers
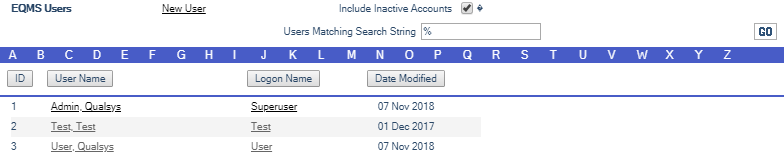
To create and maintain user records, navigate to System Manager | Security | Users. Check Include Inactive Accounts. You will be presented with a similar screen to below:
Note:
Before creating new user records, be sure to check Include Inactive Accounts and filter using the appropriate alphabetical letter and check to see that the User record does not already exist.
- Select New User, located above the User Name column heading. The User Details screen is presented similar to below:
![]()
- Complete the required fields and select the Save icon.
- The First Name, Surname, Logon Name and Password fields are mandatory.
- Modifications to fields ID and Date Modified are not permitted.
- If Active is unchecked then the User will be recognised by the system but refused access.
- External User, if checked, indicates that this user is external to the EQMS system and does not have login access. Notifications or Actions issued to them will automatically be sent via email providing a valid email address has been defined in their user details.
- Select the appropriate alphabetical letter to locate the User record
Note:
Search using % as a wild card to reveal the full user list
- Select the User Name or Logon Name to view the details. You will be presented with the User Details screen similar to below:

- Modify the User record and select the Save icon.
- To modify the User’s Password select the Password icon from the blue icon bar. You will be presented with the following screen:
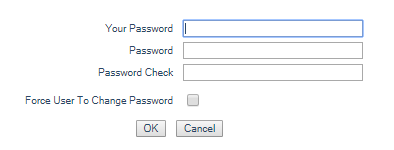
- Provide your encrypted password then enter the Users new Password confirming it in the Password Check field. You may also force the user to change their password when they next sign into EQMS by checking Force user to change password.
- Select OK to change the User’s password or Cancel to reject the password change. You will be presented with an overlaid dialogue screen similar to this:

- Select OK to continue
Important:
The Password is case sensitive and must be a minimum of 6 and a maximum of 12 characters in length and can be alphanumerical.
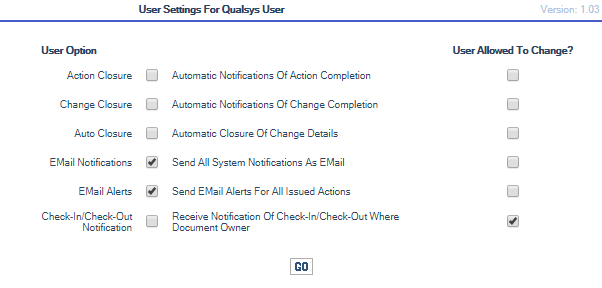
- To alter a User’s variable options select the User Settings icon from the blue icon bar in the User Details screen. You will be presented with the User Settings for User name screen similar to this:
| Setting | Description |
|---|---|
| Action Closure |
Automatic Notifications of Action Completion If you are the defined Change Manager or Finding Owner you will get an email when an associated action is closed |
| Change Closure |
Automatic Notifications of Change Completion If you are the defined Change manager or Finding owner you will get an Email when a Change/Finding is auto closed |
| Auto Closure |
Automatic Closure of Change Details No longer in use |
| Email Notifications |
Send All System Notifications as Emails User will receive an Email along with a To Do list item for any notification massages sent by the system (Training Manager Notifications are sent regardless) |
| Email Alerts |
Send Email Alerts for all Issued Actions User will receive an Emails alert along with a To Do list item for any Actions that require completing |
| Check-In/Check-Out Notifications |
Receive notifications of Check-In/Check-Out where document owner. Document Manager will receive an email Notification along with a To Do list item when one of their Documents is checked out/in by another administrator |
- Choose the settings you wish to apply by ticking the check boxes under User Option. In most situations Email Notifications and Email Alerts will be set to True (Ticked)
- These settings are enforced and remain unalterable by the User. If you wish to give the User permission to alter these settings then the corresponding check box must be set to True (ticked) under User Allowed to Change?
Imporant:
Transferring functionality is a one way transfer. If you want to transfer the functionality back at a later date, the system will move all functionality from the other user back to the original user, including functions that were not part of the original transfer.
- To transfer modular functionality, ownership and responsibilities from one User to another select the Functional Transfer icon from the blue icon bar in the User Details screen. You will be presented with the EQMS Functional Transfer screen similar to this:
![]()
- Select which Functions you want to transfer by clicking on the corresponding check box. Select which User to transfer the Functionality to by expanding the User dropdown box or by selecting the Load User List icon located to the right of the Transfer selected areas to field. The User Selection List screen similar to this is displayed:
- When you have made your selection click the GO button located far right of the Transfer selected areas to field. The following screen will be displayed:
![]()
- Select OK to transfer the functionality or Cancel to reject the request.
- The EQMS Functional Transfer screen will be displayed with the items transferred highlighted in red.
![]()
- To close the EQMS Functional Transfer screen select the red X located top right of the screen.
- The transferred functionality remains highlighted whenever you select the Transfer icon from a User Details and is correct for the date and time displayed.
Important:
This does not prevent the transferred functionality being selected for the same User at a later date.
Where the User appears in a Group, either as Group Owner, Group Contact or Group member, they will be removed and replaced by the selected User. This effects Permissions and delivery of Notifications.
This will transfer the Users To Do List items from Document, Change and Audit Manager to the replacements To Do List. Any Issued Actions or Actions Awaiting Issue, any Reminders or Notifications will be transferred to the selected replacement. All future Actions will only be transferred if the Change Management option is selected and any future Notifications will be transferred if the Document Management option and the Group Membership option are selected.
Where the User is a Document Owner or has Permissions (to view, update etc), or is a Document Control Type Owner or has Permissions (to view, update etc), or is a Document Set Owner or has Permissions (to view, update etc), or Structure Component Owner or has Permissions (to view, update etc), the responsibility is transferred.
Ownership of Approval Paths and of currently open Changes or RFC’s is transferred. Also if the User is the designated Live Document’s Change Manager or a Document Type’s selected Change Manager for Documents of that Type both will be transferred.
Ownership of open Audits and Audit Findings is transferred.
|
© Qualsys Ltd 2019 All Rights Reserved |
info@qualsys.co.uk +44 114 282 3338 Aizlewood's Mill, Nursery Street,Sheffield, S3 8ND |