Uploading Documents
Audience: Document managers, Document administrators
via Navigator | via Documents | Batch Upload
To upload a document into the system can be done several ways. Which way you use will be dependent on where you are in the system
| Upload Option | Location |
|---|---|
|
Create a document within a folder |
Navigator |
|
Drag & Drop files within a folder |
Navigator |
|
Create a new document |
Documents |
Uploading documents via Navigator
If a folder structure is already defined within Navigator and therefore a location for your document is already defined, uploading documents directly through Navigator into the structure is a quick and easy way to upload a document.
Navigator can be found by navigating to to Home > Documents > Navigator. You will be presented with a screen similar to below:
- In the top right corner select 'Create document' from the options/actions dropdown.
- Define the document details in the Create document panel, as described here
- Navigate through the structure into the folder you wish for your new document to be located.
- From your local file explorer on your desktop, drag and drop your chosen file(s) into the 'Drag and drop' area at the bottom of the navigator screen.
- Define the document details in the Create document panel, as described here
Uploading documents via Documents
If you don't want to upload directly to the Navigator, you can upload straight to the document storage with the option to link the document to as many required areas of the Navigator as required at a later time/date or not at all.
Navigate to Home > Documents > Documents and you should be presented with a screen similar to the one below:
- Select the 'Create icon' in the top right
- A new screen will appear where you can define the new document's details as defined below:
Creating a document record
Whether uploading via navigator or documents a record containing details needs to be completed before you can upload the document into the system.
Note:
- Uploading via Navigator will produce a panel from the right-hand side where the record details need to be filled in, whereas uploading from documents directs you to the full 'Create document' screen.
- The details recorded are exactly the same with each method
- First, provide the mandatory title and an optional description or synopsis
- Enter a version number
- Select a document type
- If the document type includes association custom fields, there may be additional information that will need to be supplied
- Upload the file (unless you started the processes by dragging and dropping your chosen file into the system)
- Additionally, you can:
- Amend permissions (unless enforced)
- Set notifications (unless enforced)
- Link to the navigation structure
- Link to Related documents
- Select save to confirm
See below for additional information on any of these steps.
Don't worry if you miss or forget any of the mandatory fields as the system will prompt you when you select save.
- A document type will also need to be chosen by selecting
 Select from under the document type heading. This will being up the select document type modal, similar to below:

[click image to expand]
- Select a document type from the list by checking the box in the far left of the suitable row
- Select confirm to associate this document type to the record
Once a document type has been associated to the record, restriction permissions and notifications will be pulled through. If these are not enforced they can be edited if necessary
If an appropriate document type does not exist:
- Select
 Create, this will reveal the create document type screen in a new panel.
 - Follow the instructions as defined here for adding a new document type
- Once created, the new document type will be applied to the new document record.
Note:
If you do not have permission to create new document types, the create option will not be displayed.
Documents can be restricted so that only users within a defined group can view/edit/delete this document.
If you wish to remove any already applied permissions to the document either:
- Un-tick the Restrict check box to remove ALL permissions on the group
- Select the remove icon next to the groups you wish to remove from the permitted list of groups
To restrict the document:
- Tick the Restrict check box in the Restrict permissions box in the right hand side of the screen.
- Select the Select button. This will present you with a Select group modal similar to below
- Use the Select group modal (standard list screen filters apply) to find the required group(s)
- Once located, check the box in the far left of the suitable row(s)
- Select confirm to associate the groups to the document
- Once a group is selected, decide what level of permissions that group should have:
| Option | Description |
|---|---|
| Viewer | Can only view the document |
| Editor | Can edit this document |
| Editor with delete | Has the ability to edit this document and delete it |
| Administrator | Can do anything to this document completely unrestricted |
Document can generate notifications when a new version goes live. These notifications are sent to groups of users. You can define the notification requirements in the right hand side column of the detail screen, similar to below:
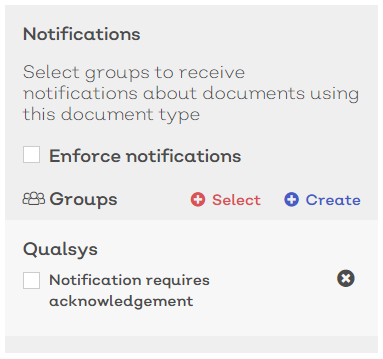
If you wish to remove any already applied group to be notified:
- Select the remove icon next to the groups you wish to remove from the permitted list of groups
To add a notification group to the document:
- Select the Select button under the notifications section on the right hand side of the screen
- Use the Select group modal (standard list screen filters apply) to find the required group(s)
- Once located, check the box in the far left of the suitable row(s)
- Select confirm to associate the groups to the document
- Once the group is selected, select 'Notification requires acknowledgement' if you require users to acknowledge receipt of the document
If the group does not exist, you can create a new one:
- Select Create. A create new group panel will appear, similar to below:
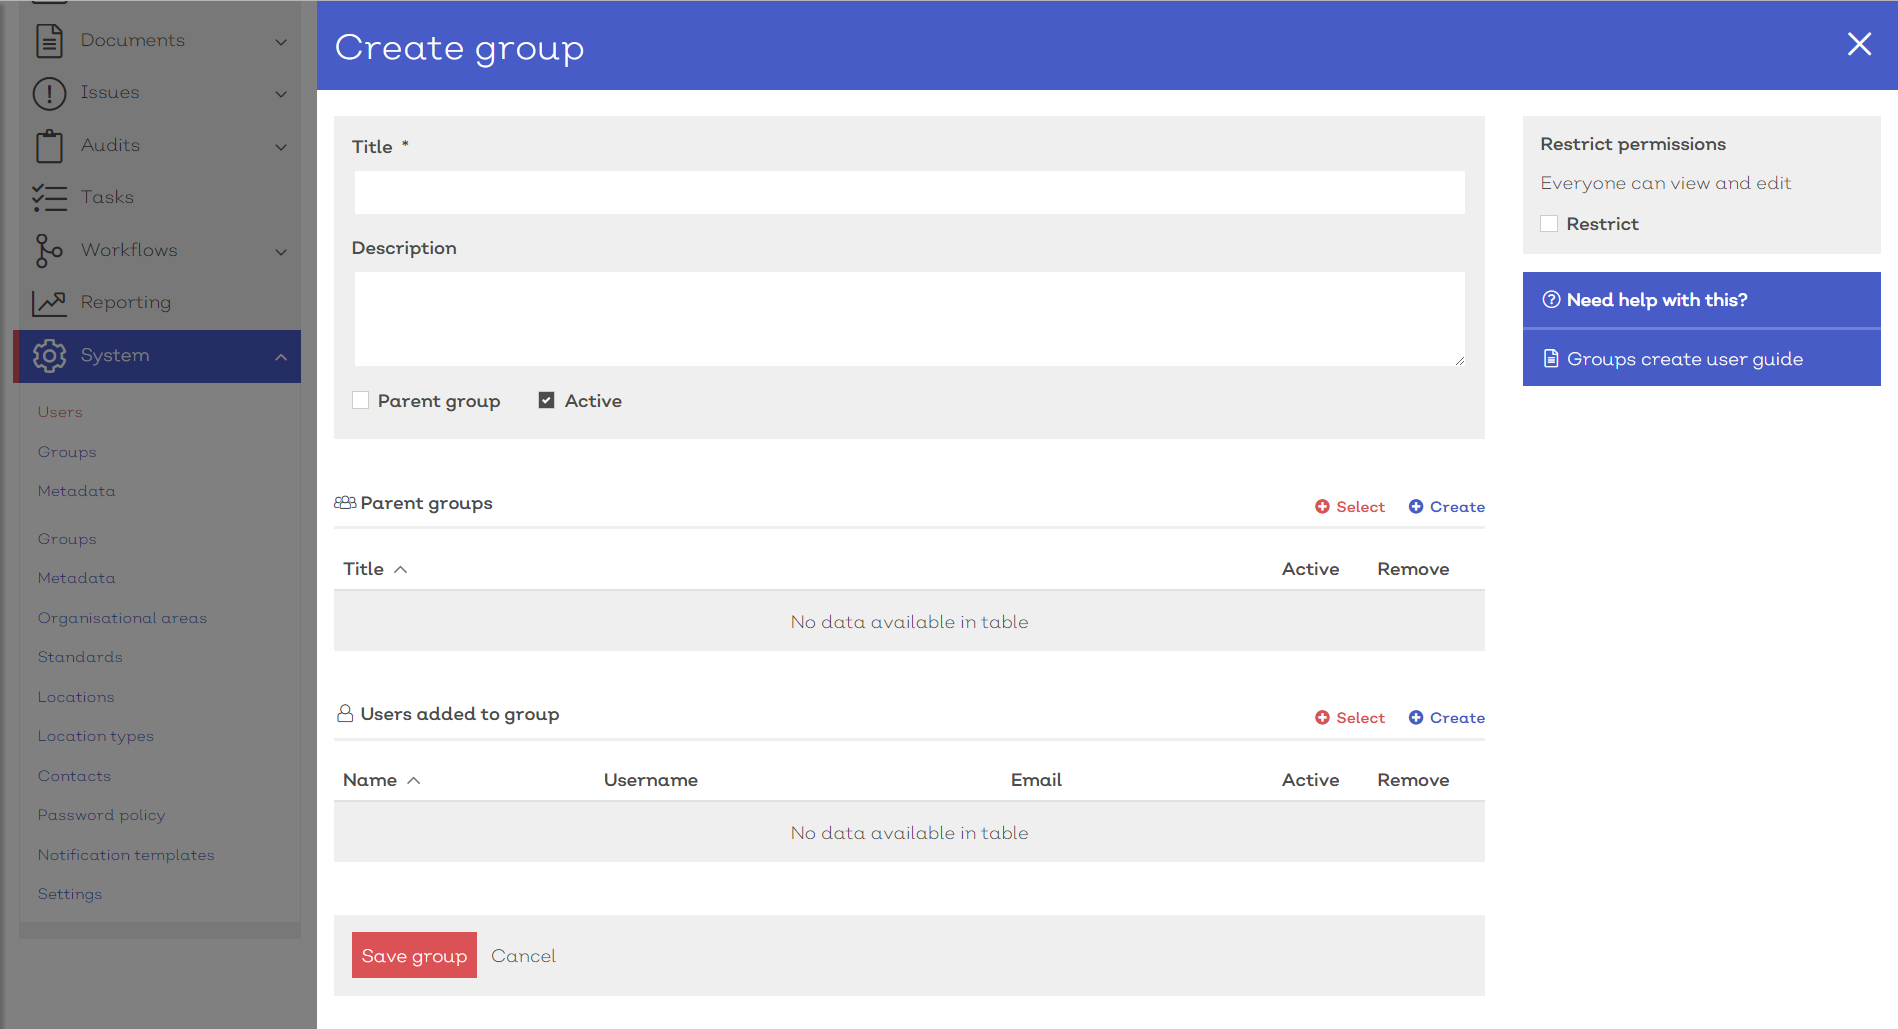
[click image to expand]
- Follow the instructions for creating a new group as defined here
Important:
- If you have used the 'Drag and drop' method, the file you wish to upload will already be associated to the record.
To upload a document to associate to the record:
- Select 'Select a file to upload', this will open your local file explorer
- Select the file you wish to upload and either:
- Drag and drop into the drag and drop area
- Click open
- Once a file has been fully uploaded, you will see the item turn green
- To remove an attached document, select the remove icon
- If you need to replace the uploaded file, simply repeat the process above.
If the document has a status of 'Link to structure' it means that the document is Live but, is not visible via the Navigator. To link the document to the structure via the Document details screen, follow the instructions below.
Note:
- If you have uploaded via Navigator, the link to the structure will already be included in the details.
- You can have more than one link to Navigator folders
- Select Select under Navigation folders in the edit document details screen. This will present you with a select folder module, similar to below:

[click image to expand]
- Within this modal, navigate through the folder structure to where you wish your document to be placed
- Check the box in the far left of the folder you wish to place your document under
Tip:
You can select multiple folders for where you wish your document to be placed. When the document is updated, it will be updated in all locations in the navigator
- Once you have decided upon the documents navigator location, select confirm to add this to the document record
- Once you are happy with all of the details provided with this record, select Save to save the record and complete the upload.
Note:
- Standard documents will appear directly in the system and can be located in the document list and wherever the document has been linked in the structure
- Controlled documents must undergo the defined approval process before they are live in the system
- Effective dates may apply which will delay the issue of the document be the specified amount of days
Documents can be associated to other documents within the system. Associating documents together can be useful if, for example, the documents are all standard operating procedures and the procedures they define are intrinsically linked to one another. When associated , if a documents is updated, the owners of all the associated documents are notified.
To link documents to one another
- Select Select under Associated documents header in the edit document details screen. This will present you with a select document module, similar to below:
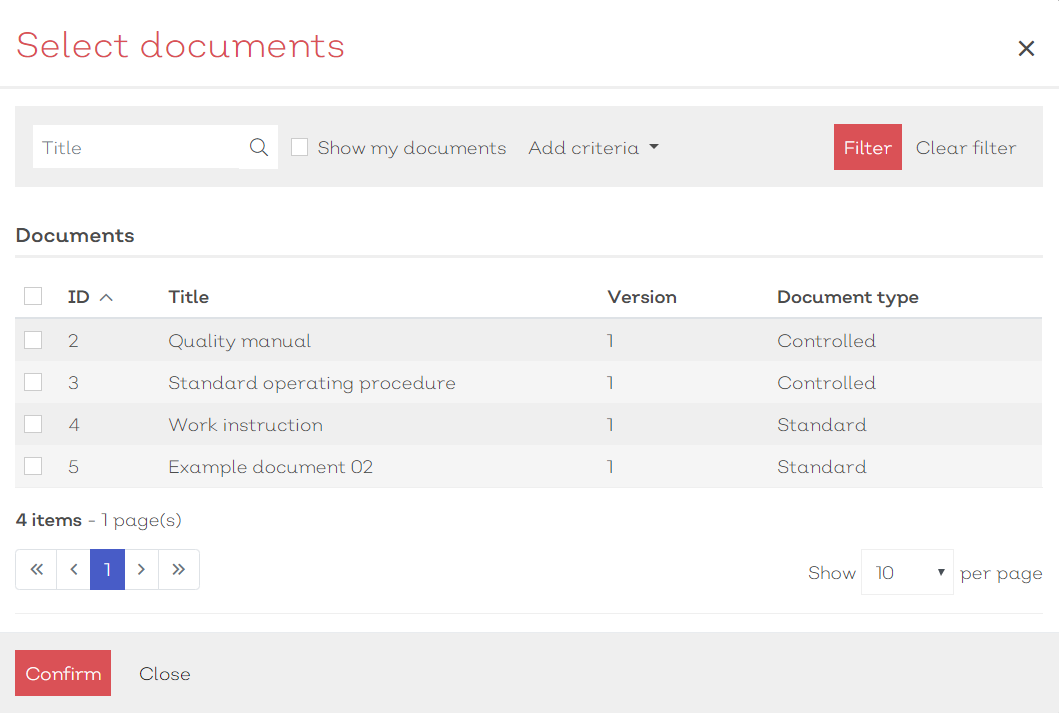
[click image to expand]
- Check the box in the far left of the relevant row for the document(s) you wish to associate
- Select Confirm to complete the association
Batch uploading documents
Documents of the same type can be batch uploaded together into the system for ease of use. However, it is worth noting that all documents within a batch will all be associated with the same Document type and will all start life in the EQMS system with the same version number.
Batch uploading can be really useful when uploading documents such as receipts, reports and forms.
To batch upload documents to EQMS:
- Either:
- Drag and drop multiple documents at once into the Drag & drop zone that can be found in folders within the Navigator
- Navigate to Home > Documents > Documents and select New batch upload
Once the files begin to upload you should be greeted with a screen or panel similar to below:
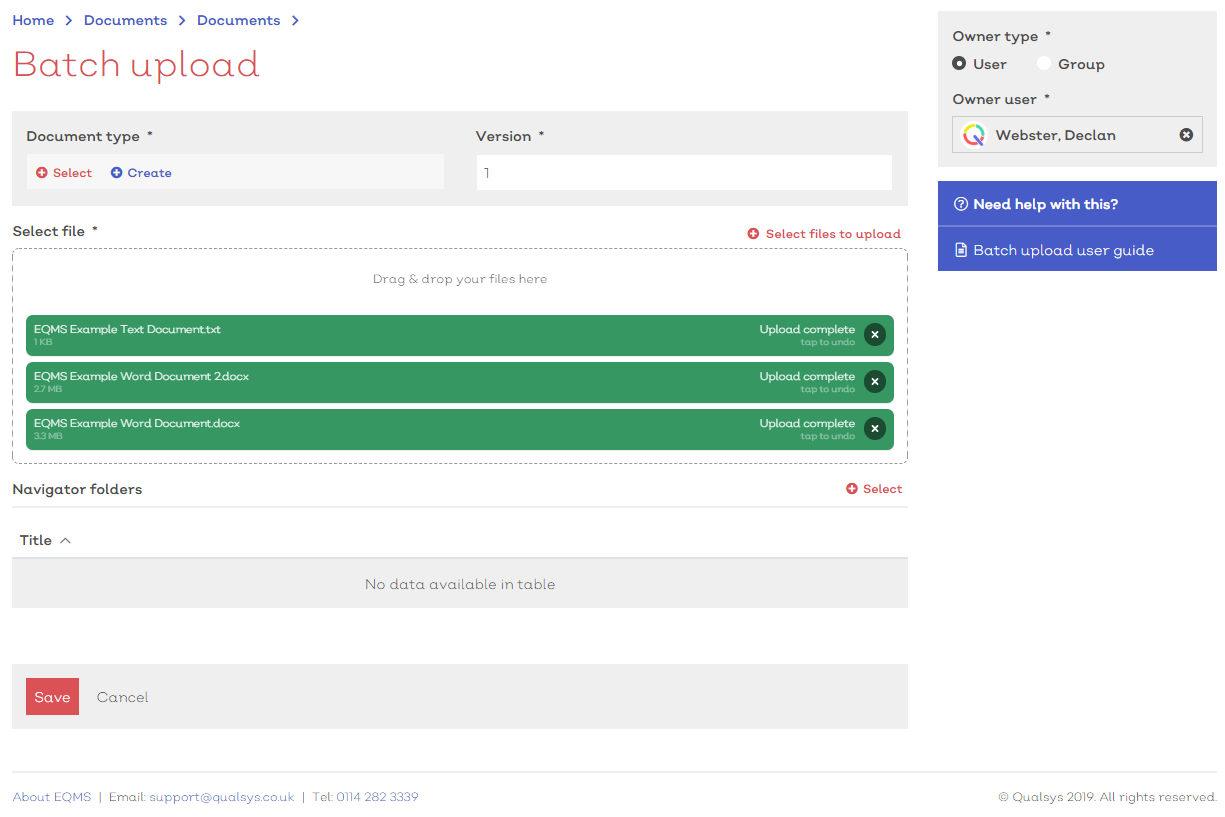
[click image to expand]
Note:
You can add additional documents to the batch once the Batch upload screen appears
- Select a document type. For more information on selecting a document type, see here
Once a document type has been associated to the record, restriction permissions and notifications will be pulled through. If these are not enforced they can be edited if necessary
- If required, amend the version number.
Note:
This version number will apply to all documents in the batch
- If you want to link the documents to the Navigation structure, see here
- Once you are happy that all required documents are uploaded and the details are correct, select save to confirm