Document types
Audience: Document Administrators, Document Type Managers
Document type list | Document type details | Create new | Edit existing | Copy
Document types are used to define how different types of documents are handled and controlled by the system. They allow you to mandate the permissions applied, the details captured and decide who should be notified of uploads and changes.
Document type list
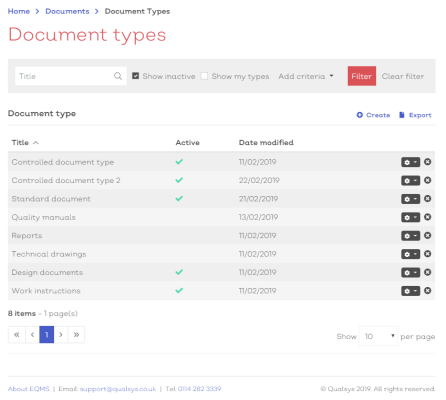
- To view, create and edit document types, navigate to Home > Documents > Document types. You should be presented with a screen similar to below:
[click image to expand]
- Select any option from the list to view the details.
- Standard list screen filters and Export available.
- Additional filter of 'Show my types' available. If this box is checked, the list will only display document types you own.
Selecting the options icon [![]() ] at the end of each row will reveal how you can interact with the record.
] at the end of each row will reveal how you can interact with the record.
For document types, the options are**:
| Option | Description |
|---|---|
| View | Select to view the details screen |
| Edit | Select to enter the document type details edit screen |
| Copy | Select to use the document type as a template for a new document type |
**Permissions apply
View document type details
To view a document type's details screen either:
- Select the type title from the list screen
- Select View from the options dropdown [
 ]
]
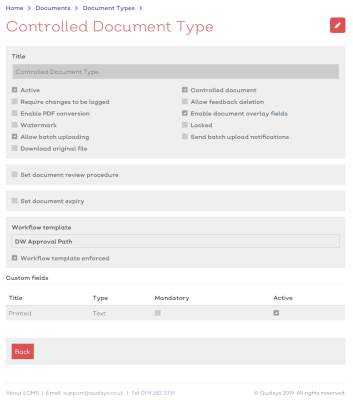
You will be presented with a screen similar to below:
[click image to expand]
The details screen is read only and all fields should be greyed out.
If you have the correct permissions, several options will be available in the top right:
| Icon | Title | Description |
|---|---|---|
| Edit | Allows you to access the edit details screen | |
| More | Select to view additional options available |
The additional options available under the more icon are:
| Option | Description |
|---|---|
| Copy | Select to use the record as a template for a new document type |
Create new document type
To create a new document type
- Navigate to Home > Documents > Document types.
-
Select
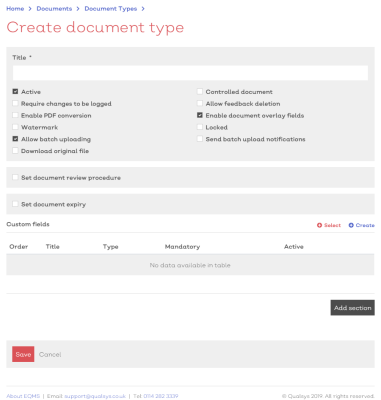
Create. You should be presented with a screen similar to below:
[click image to expand]
- Provide a suitable title for the document type
- Amend the document type settings:
| Option | Description |
|---|---|
| Active |
When set, the document type will be available for selection for all permitted users when uploading a new document to the system. If unchecked, the document type will not be in use. |
| Require changes to be logged |
When set, users are required to leave comments when making any changes to the documents or document details for all documents of this type. |
| Enable PDF conversion |
When set, documents will be converted to PDF for read only users where available |
| Watermark | When set, enables the ability to have a watermark appear on the document when converted to PDF |
| Allow batch uploading | When set, enables the ability for document managers to be able to batch upload documents of this type. |
| Download original file | When set, enables the ability for users to be able to download the original file locally. |
| Controlled document |
Enables document approval. Documents of this type must be approved via a defined workflow before they are issued within the system. See below for additional details Note: If apply controls to new documents is not enabled in the document settings, documents will not require an initial approval and will only require approval when a new version is uploaded. |
| Allow feedback deletion | When set, allows the ability for feedback comments left by users to be deleted from the change log for the document |
| Enable document overlay fields | When set, enables the use of document overlay fields |
| Locked | When set, the document type details are locked and cannot be amended for any document of this type |
| Send batch upload notifications | When set, the system will notify the defined notification groups when documents of this type are batch uploaded to the system. If not set, notification groups will only receive a notification when individual documents are uploaded. |
If documents of this type require regular reviews, you can define the period and instructions for the review in this section.
[click image to expand]
- Tick the Set document review procedure check box
- Enter the Review period in months
Note:
The default period is defined in the module settings
- Provide the review instructions. The text entered here will be included in the review task that is issued to the document owner when the document is due for review ( 1 month prior )
If documents of this type have a finite lifespan, you can define their expiry period and instructions for deletion in this section.
[click image to expand]
- Tick the Set document expiry procedure check box
- Enter the Expiry period in months
Note:
The default period is defined in the module settings
- If, instead of a manual expiry task, you require documents of this type to be 'auto removed' (i.e. Sent to the document archive) once the expiry period is done, tick the Auto remove check box
- Provide the expiry instructions. The text entered here will be included in the expiry task that is issued to the document owner when the document is due for expiration ( 1 month prior )
Note:
Only appears for document types set as controlled.
To associate a workflow template
- Select
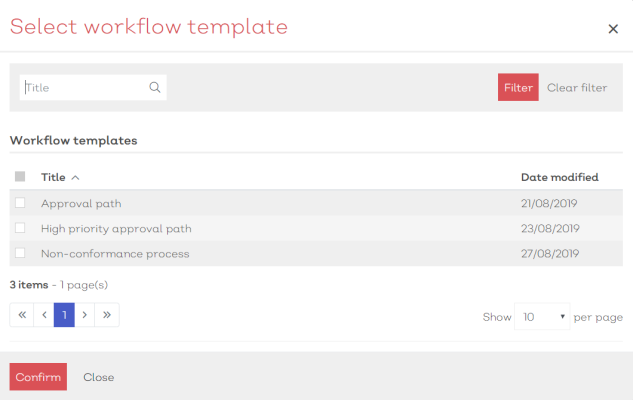
 Select. This will present you with a Select workflow template modal similar to below:
[click image to expand]
-
Use the Select workflow template modal to find the required approval path
-
Once located, check the box in the far left of the suitable row(s)
-
Select confirm to associate the workflow template to the document type
If the workflow template does not exist, you can:
- Select
Create. A create new workflow template panel will slide into view, similar to below:
[click image to expand]
- Follow the instructions here to create the new workflow template
Note:
Permissions apply. If you do not have permission to create new workflow templates, the Create option will not be available to you
If there is any additional data that you would like to be logged against documents of this type (e.g. Project, Printed location, Document author) you can associate custom fields for capturing and reporting on this data in the custom fields section, as shown below:
[click image to expand]
Add custom field sections
If you are going to have several custom fields added to the details of documents of this type, they can be split into sections for both presentation and permissions purposes.
To add a section, simply:
- Select the Add section button
- Provide a title for the section
To associate a custom field:
- Select
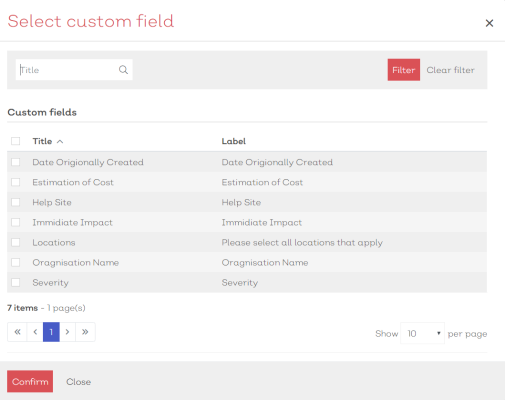
 Select in the section you want to add the field to. This will present you with a Select custom field modal similar to below:
[click image to expand]
-
Use the Select custom field modal to find the required field(s)
-
Once located, check the box in the far left of the suitable row(s)
-
Select confirm to associate the custom fields to the document type
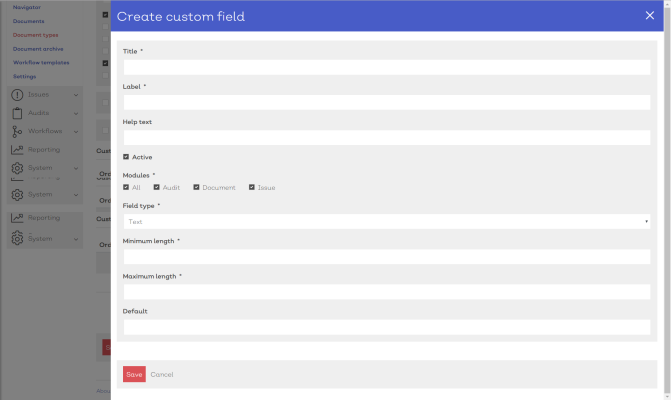
If the custom field you need does not exist, you can:
- Select
Create. A create new custom field panel will slide into view, similar to below:
[click image to expand]
- Follow the instructions here to create the new custom field
Note:
Permissions apply. If you do not have permission to create new custom fields, the Create option will not be available to you
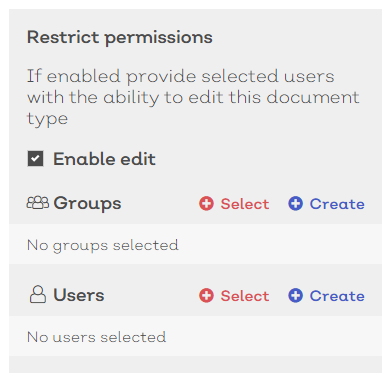
Document types can be restricted so that only users within a defined group can view, edit or delete. You can define the document type permissions down the right hand side column of the details screen, similar to below:
[click image to expand]
To allow specific groups or uses to edit the document type
- Tick the Enable edit check box in the Restrict permissions box in the right hand side column of the screen.
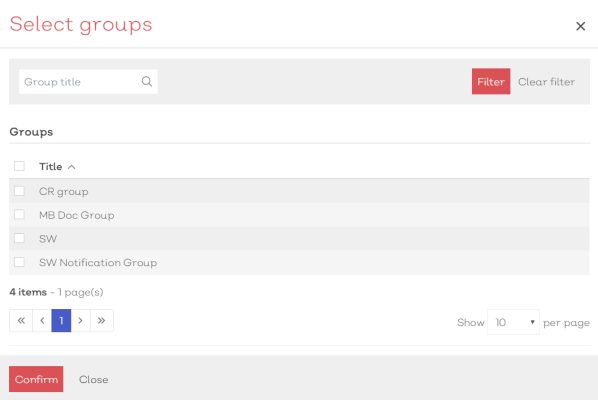
- Select
 Select in the Groups or Users section. This will present you with a Select group or user modal similar to below:
[click image to expand]
-
Use the Select group/user modal to find the required group(s)/user(s)
-
Once located, check the box in the far left of the suitable row(s)
-
Select confirm to associate the group(s)/user(s) to the document type
If the group or user does not exist, you can:
- Select
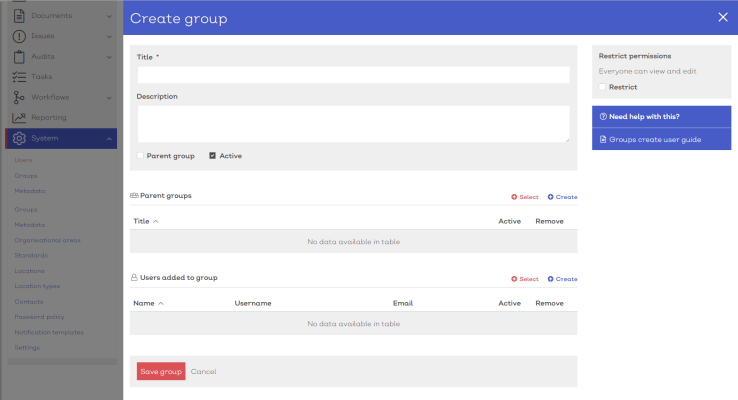
Create. A create new group/user panel will slide into view, similar to below:
[click image to expand]
Note:
Permissions apply. If you do not have permission to create new groups or users, the Create option will not be available to you
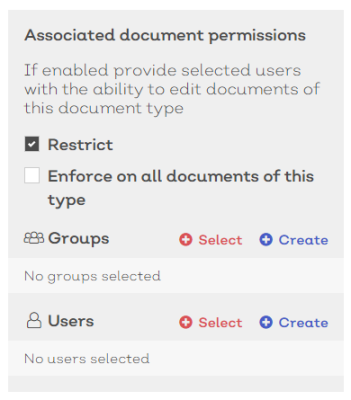
If you need to restrict and apply permissions to the individual documents of this type so that only selected users or groups can View, Edit or Delete documents of this type, you can define the permissions in the Associated document permissions section of the right hand side column of the screen, similar to below:
[click image to expand]
To restrict the documents of this type
- Tick the Restrict check box in the Restrict permissions box in the right hand side column of the screen.
- To enforce these settings across ALL documents of this type, tick the Enforce on all documents of this type check box
- Select
 Select. This will present you with a Select group/user modal similar to below:
[click image to expand]
-
Use the Select group/user modal to find the required group(s)/user(s)
-
Once located, check the box in the far left of the suitable row(s)
-
Select confirm to associate the group(s)/user(s) to the document
-
Once a group or user is selected decide what permissions they will have:
| Option | Description |
|---|---|
|
Viewer |
Can only view the documents |
|
Editor |
Can edit these documents |
|
Editor with delete |
Has the ability to edit these documents and delete them |
|
Administrator |
Has full administrator permissions for documents of this type |
If the group or user does not exist, you can:
- Select
Create. A create new group/user panel will slide into view, similar to below:
[click image to expand]
Note:
Permissions apply. If you do not have permission to create new groups or users, the Create option will not be available to you
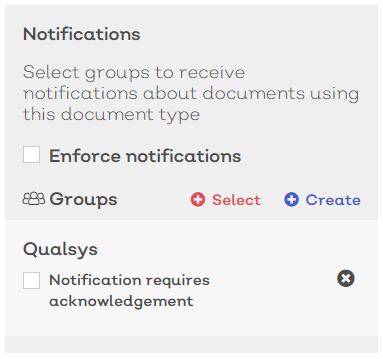
If you want to ensure that specific users or groups of users are notified when documents of this type are uploaded or up-versioned in the system, you can define the notification requirements in the right hand side column of the detail screen, similar to below:
[click image to expand]
To enforce any notification settings
- Tick the Enforce notifications check box. This will ensure all documents of this type use the defined notification settings. If left un-checked, users will be able to modify the notification settings for each specific document of this type.
To add a notification group:
- Select
 Select under the notifications section on the record. This will present you with a select group modal similar to below
[click image to expand]
- Use the Select group modal (standard list screen filters apply) to find the required group(s)
- Once located, check the box in the far left of the suitable row(s)
- Select confirm to associate the groups to the document
- If you require users to acknowledge receipt of the document tick the ‘Notification requires acknowledgement’ check box
If the group does not exist, you can:
- Select
Create. A create new group panel will slide into view, similar to below:
[click image to expand]
- Follow the instructions here to create the new group
Note:
Permissions apply. If you do not have permission to create new groups or users, the Create option will not be available to you
Edit existing document types
To edit an existing Document type:
- Navigate to Home > Documents> Document types.
- Either:
- Select a Document type from the list to view the edit screen
- Select Edit document type from the options icon [
 ] in the relevant row
- For more information on document details, see above
- To remove any information, select the delete icon next to the relevant data in the details screen
Copy document type
To copy an existing Document type:
- Navigate to Home > Documents> Document types.
- Either:
- Select a Document type from the list to view the edit screen and select Copy from the more options icon [
 ]
] - Select Copy document type from the options icon [
 ] in the relevant row
- Select a Document type from the list to view the edit screen and select Copy from the more options icon [
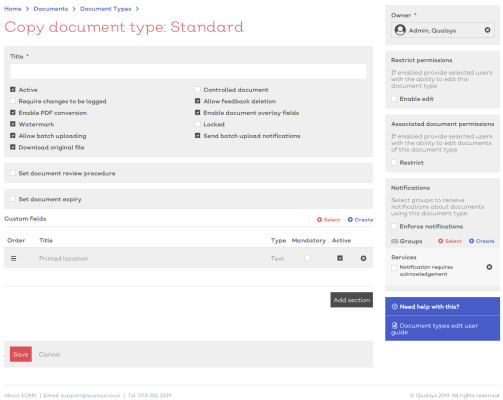
This will reveal a new Document type details screen with all core details from the copied document type contained within including any associated custom fields, permissions and notification groups.
[click image to expand]
- Complete the details for the new document type by amending any of the existing fields. For more information on creating a new document type, see above
