Audit records
Audience: Audit administrators, Audit managers, Audit users
List | Details | Create | Edit
The following section of the guide will support you through the process of raising new and amending existing audit records. The types of records you have permission to raise in the system will vary depending on the restrictions placed on your system and user account. Audit records can vary in function from logging and daily inspections through to quality management system audits. For the purpose of these guides, all types of audit record will be referred to as Audits/Audit records.
Audit list
To view the audit list:
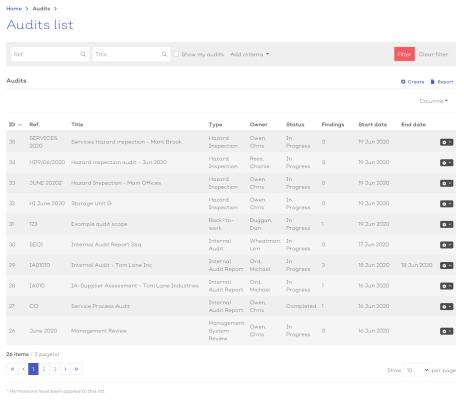
- Navigate to Home > Audits > Audits list . You should be presented with a screen similar to below:
[click image to expand]
Select any audit from the list to view the record details
-
Standard list screen filters and Export available.
- Additional filter of 'Show my audits ' available. If this box is checked, the list will display only audit records where you are listed as the owner.
You can perform multiple actions from the audits list screen by selecting the appropriate option at the top of the list.
Those options are:
| Option | Description |
|---|---|
|
Create |
Select this to create a record for a new audit record |
|
Export |
Select this to export the list screen as a table. Keeping any applied filters in place. |
Selecting the options icon [![]() ] at the end of each row will reveal how you can interact with the record.
] at the end of each row will reveal how you can interact with the record.
For audit records, the options are:
| Option | Description |
|---|---|
| View | Select to view the audit details screen |
| Edit | Select to enter the audit details edit screen |
Audit record details
To view the details for an audit record:
- Navigate to Home > Audits > Audits list
- Select the audit from the list screen
- Select View from the options dropdown [
 ]
]
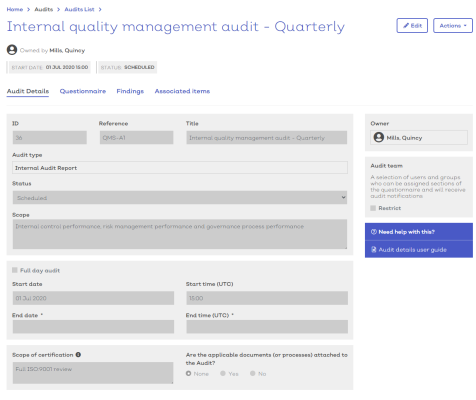
You will be presented with a screen similar to below:
[click image to expand]
The details screen will list all key details for the audit including: status, audit type, scope, dates, questionnaire tab and associated items tab. Additionally, you can view the activity log for the record and leave a comment.
Note:
- The details screen is read only and all fields should be greyed out.
- Select the edit icon in the top right to access the edit details screen
Raise new audit record
To create a new issue record:
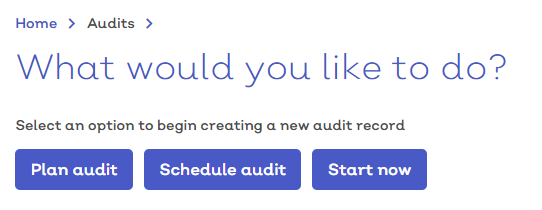
- Navigate to Home > Audits > Create audit. You should be presented with a screen similar to below:
[click image to expand]
- Select one of the options presented.
| Option | Description |
|---|---|
| Plan audit |
Create a new audit record in a 'planned' state. Planned audits do not required dates to be specified. |
| Scheduled audit | Create a new audit record in a 'scheduled' state. Includes defining the intended dates for start and completion. |
| Start now | Create a new audit and jump straight to a state of 'In progress' and begin auditing straight away. |
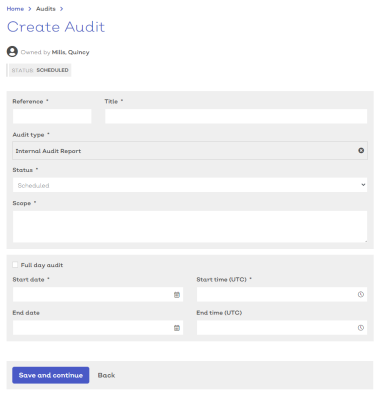
- Next, select an audit type. The screen will refresh to reveal the relevant details for the selected audit type.
- Enter an audit reference. This is usually a short abbreviated code to easily identify and sort the audit record.
- Provide a title.
Note: Each audit record requires a unique code and title combination.
- Enter a description of the scope for the audit.
- Define the dates and times for the audit.
- Only mandatory for scheduled or in progress audits.
- In progress audits will have the current date and time set as the default start.
- End dates or times are not mandatory.
- The 'Full day audit' check box will hide the time fields and assume the audit is a full day event.
- Additionally, you can:
- Amend Audit team (unless enforced). Members of the audit team can be assigned as auditors against the questionnnaire and will receive relevant notifications for the record.
- Select save and continue to confirm
Note: Depending on the configuration of the audit type additional custom fields may be visible.
Once the screen refreshes, the additional Questionnaire, Findings and Associated items will become available for review and editing.
See below for additional information on any of these steps.
Don't worry if you miss or forget any of the mandatory fields as the system will prompt you when you select save.
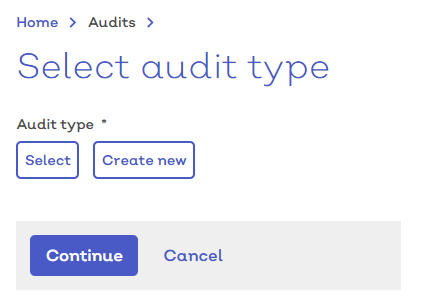
When you raise a new audit record, you will be asked to select which type of audit you would like to create.
[click image to expand]
- Select
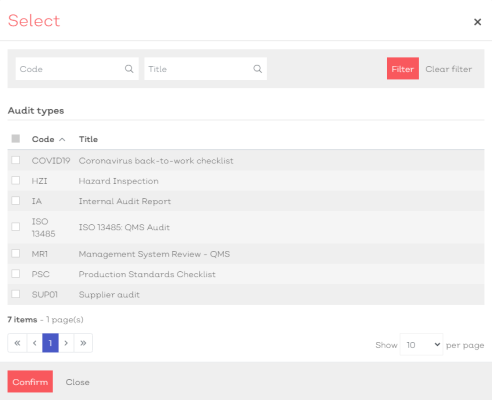
 Select to choose the required audit type. You will be presented with a modal list screen of existing audit types, similar to below:
[click image to expand]
- Tick the check box in the row of the audit type you wish to raise.
- Select Confirm to continue
Once an audit type has been selected the screen will refresh to reveal the full new audit details screen, similar to the one shown here:
[click image to expand]
Note:
Depending on the configuration of the audit type additional custom fields may be visible.
If the audit type you require does not exist:
- Select
Create, this will reveal the create audit type screen in a new panel.
- Follow the instructions as defined here for adding a new audit type
- Once created, the new issue type will be applied to the new issue record.
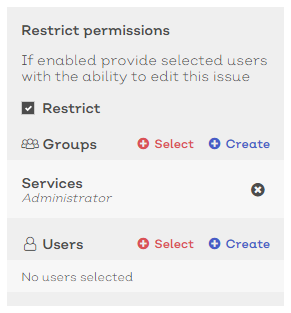
The audit team defines which users and groups can view, edit or administrate this record. Users included in the team or associated groups will receive relevant notifications throughout the life cycle of the audit.
To restrict the record
- Tick the Restrict check box in the Audit team box in the right hand side column of the screen.
[click image to expand]
- Select
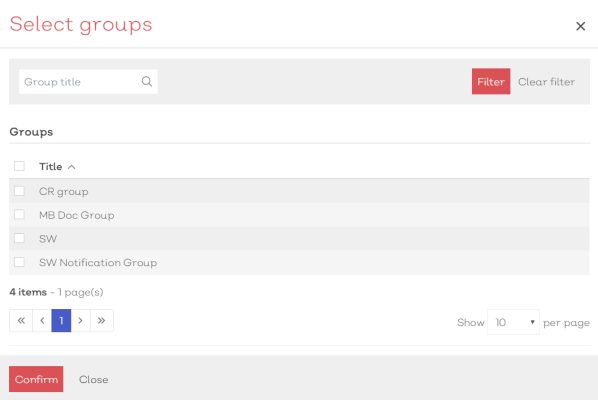
 Select. This will present you with a Select group modal similar to below:
[click image to expand]
-
Use the Select group modal to find the required group(s)
-
Once located, check the box in the far left of the suitable row(s)
-
Select confirm to associate the groups to the document
-
Once a group is selected decide what permissions they will have:
| Option | Description |
|---|---|
|
Viewer |
Can only view the record |
|
Editor |
Can edit the audit record details and be assigned as an auditor in the questionnaire. |
|
Administrator |
Has full administrator permissions for this record including the ability to amend the audit team. |
Note:
A user must also have relevant system level permissions against their user profile in order to access the audit record. If a user does not have at least audit user level access, they will not be able to access the record. Similarly, if you assign Administrator level permissions against the record, but they only have user access at a system level, they will be restricted to audit viewer access.
If the group does not exist, you can:
- Select
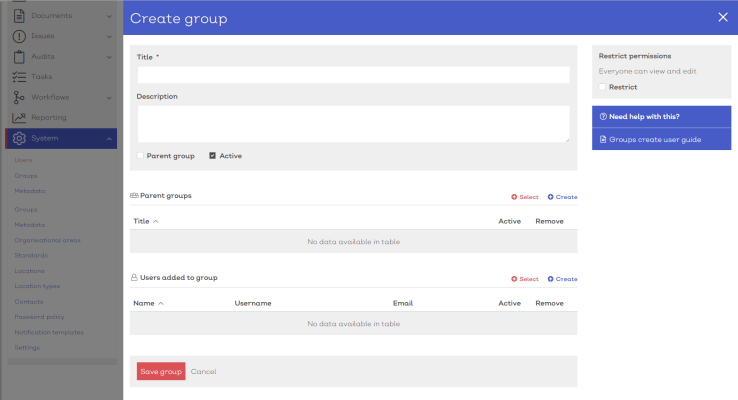
Create. A create new group panel will slide into view, similar to below:
[click image to expand]
- Follow the instructions here to create the new group
Note:
Permissions apply. If you do not have permission to create new groups, the Create option will not be available to you
Edit audit record
To edit an existing audit record:
- Navigate to Home > Audits > Audits list
- Select the audit record from the issues list screen to view the record details. From there, select the edit icon
- Select Edit from the options dropdown [
 ]
]
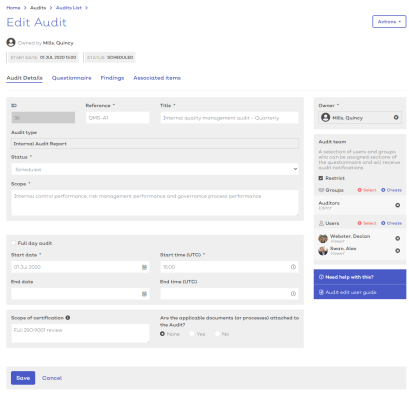
This should present you with the Edit issue details screen, similar to the one shown here:
[click image to expand]
As an Audit Administrator or permitted Audit Editor you can amend some of the key details fields for an existing audit record.
- Edit details as required, ensuring all mandatory fields contain suitable data
- Select Save to confirm any changes
Note:
- Status cannot be moved to a previous state.
- Audit type cannot be amended
- Once the audit is In progress, the start data cannot be amended.
The audit team defines which users and groups can view, edit or administrate this record. Users included in the team or associated groups will receive relevant notifications throughout the life cycle of the audit.
To restrict the record
- Tick the Restrict check box in the Audit team box in the right hand side column of the screen.
[click image to expand]
- Select
 Select. This will present you with a Select group modal similar to below:
[click image to expand]
-
Use the Select group modal to find the required group(s)
-
Once located, check the box in the far left of the suitable row(s)
-
Select confirm to associate the groups to the document
-
Once a group is selected decide what permissions they will have:
| Option | Description |
|---|---|
|
Viewer |
Can only view the record |
|
Editor |
Can edit the audit record details and be assigned as an auditor in the questionnaire. |
|
Administrator |
Has full administrator permissions for this record including the ability to amend the audit team. |
Note:
A user must also have relevant system level permissions against their user profile in order to access the audit record. If a user does not have at least audit user level access, they will not be able to access the record. Similarly, if you assign Administrator level permissions against the record, but they only have user access at a system level, they will be restricted to audit viewer access.
If the group does not exist, you can:
- Select
Create. A create new group panel will slide into view, similar to below:
[click image to expand]
- Follow the instructions here to create the new group
Note:
Permissions apply. If you do not have permission to create new groups, the Create option will not be available to you
A list of all findings raised against the audit record will be displayed in the Findings tab. Additionally, you can find a list of findings raised against any specific question by selecting the 'Associated items' option underneath the question. If there are any items already associated, they will be numbered next to the button.
For full information on creating and amending finding records, see the Finding records guide here.
MORE CONTENT COMING SOON
